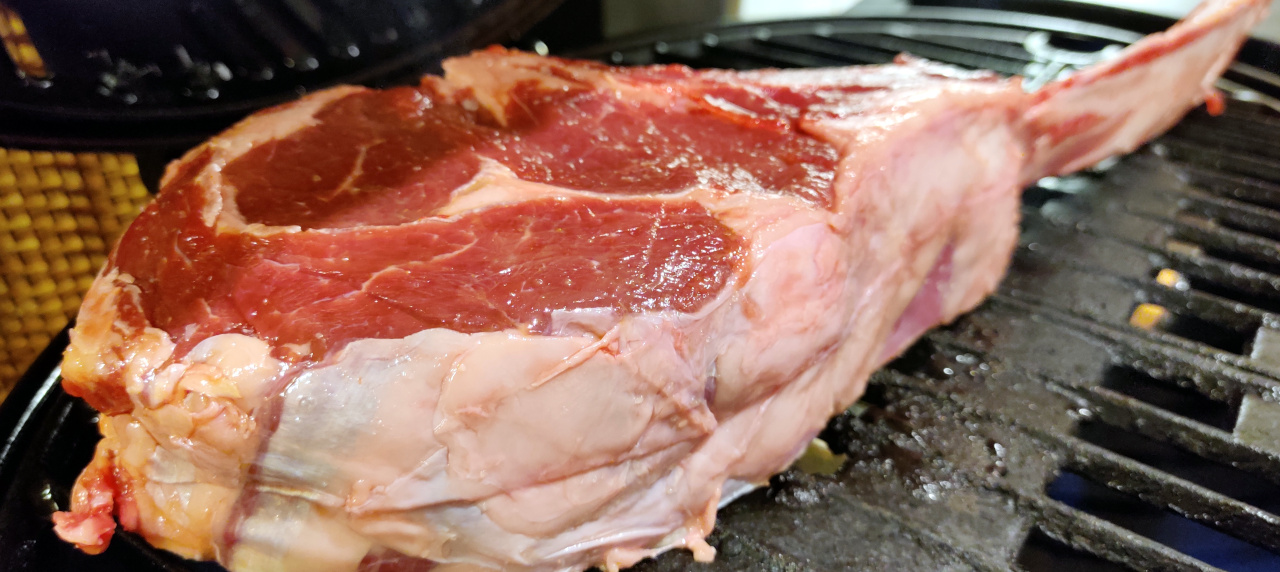
Das Wochenende war mächtig sonnig – Grund genug wieder den Grill aufzustellen und ein gutes Stück Fleisch zu „rösten“. Heute war es Zeit für das „Familien Tomahawk“ – hier hatte ich mir ein tolles Stück Fleisch der Marke CHÂTEAU BOEUF besorgt. Das Fleisch dieser Marke gibt es exklusiv bei REWE und es handelt sich dabei um französische Premium-Qualität vom Jungbullen.
Das „Scheibchen“ kam mit gut 1,4 kg daher – also trotz Knochen ausreichend für die kleine Familie – und auch das Preis/Leistung Verhältnis stimmte. Ich hatte Euch diese interessante europäische Marke ja bereits vorgestellt. Das man bei CHÂTEAU BOEUF gänzlich auf familiäre Betriebe, Tierwohl und Nachhaltigkeit setzt, sind für mich Gründe genug ein paar Euro mehr zu investieren – das schmeckt man dann aber auch!
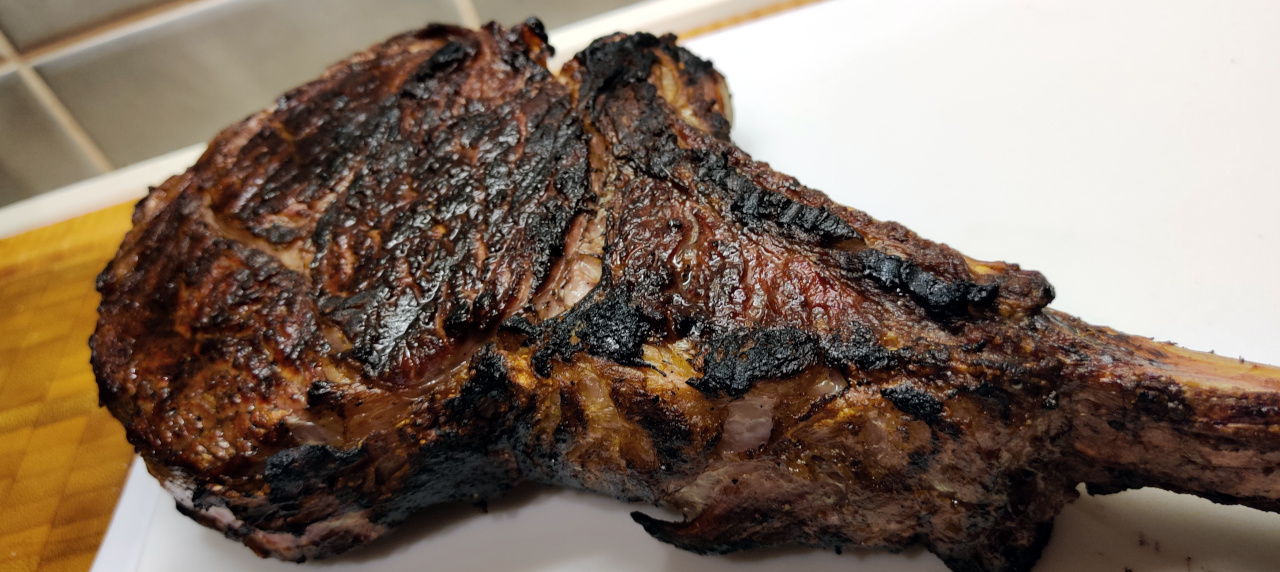
Das imposante Steak war vakuumverpackt und laut Kennzeichnung optimal gereift zum 4. April 2020 – also eine exakte Punktlandung. Die Marmorierung war bereits verheißungsvoll und die kräftig rote Scheibe, hatte eine Stärke von gut fünf Zentimetern. Wie immer, habe ich das Fleisch eine Stunde vor der Verwendung aus dem Kühlschrank genommen. Sobald es Zimmertemperatur erreicht hat, ist sichergestellt, dass letztendlich auch wirklich die gesamte Bandbreite an Aromen auf dem Teller landet.
Gerade bei vakuumverpacktem Fleisch kann es auch nicht schaden, dieses bereits 1-2 Tage zuvor aus der Folie zu „befreien“ und es dann offen im Kühlschrank „trocknen“ zu lassen (wenden nicht vergessen!). Einige Profiköche gehen davon aus, dass das Fleisch dann noch intensiver schmeckt und auch zarter wäre. Die ist auch richtig so – zu beachten ist hierbei aber, dass man dann auch einen Kühlschrank besitzen muss, indem das Fleisch keinerlei andere Aromen annehmen kann. Leider sind unsere häuslichen Kühlschränke aber immer voller anderer Aromen – was im professionellen Gasto-Bereich vermieden werden kann, wird zu Hause dann eher schwierig.
Nachdem ich die Folie entfernt hatte, habe ich das Tomahawk mit etwas Küchenrolle abgetupft und es mit feinem Himalaya-Salz ein wenig von allen Seiten (inklusive Knochen) gesalzen. Dann habe ich ein paar Tropfen nativen Olivenöls auf die Hand gegeben und dies auf der gesamten Scheibe verteilt.
Wie auch an anderer Stelle bereits erwähnt, verzichte ich vor dem Grillen nahezu immer auf das Pfeffern. Grund hierfür ist, dass der Pfeffer auf dem Grill verbrennen würde und im schlechtesten Fall das Steak leicht bitter schmecken lässt – daher, falls nötig die Pfeffermühle immer erst am Tisch zur Hand nehmen.
Den Grill hatte ich parallel auf knapp 400°C vorgeheizt und der Zeitpunkt war gekommen – ich beförderte die Scheibe auf den Grill.
Deckel zu und abgewartet bis die Temperatur wieder die 400°C erreicht hatte – was in etwa 3-4 Minuten brauchte. Dann habe ich den Grill kurz geöffnet, um die Scheibe etwas zu drehen (nicht wenden!) – damit ich ein schönes Grillmuster erhalte.

Wichtig ist, dass sich das Fleisch ganz leicht von vom Rost lösen muss – tut es dies nicht ist es noch zu früh. Nach weiteren 3-4 Minuten habe ich die Scheibe dann gewendet und nach ein paar Minuten ebenfalls etwas gedreht.
Hiernach war es Zeit sich der schmalen Seite – also den Rand der Scheibe zuzuwenden. Dies geht natürlich nur bei offenem Grilldeckel. Ich habe mir hierzu Grillzange und Wender zur Hand genommen und während des etappenweisen Wendens des Tomahawks, auch hier für das typische Grillmuster gesorgt.
Hiernach war das Steak – zumindest was die Druckprüfung (nach australischer Art) anging – in etwa beim Gargrad „englisch“ angekommen. Da ich es gerne „medium“ haben wollte, war also noch etwas Garzeit nötig. So habe ich die Scheibe dann pro Seite ungefähr weitere 4 Minuten bei knapp 400°C gegrillt, bevor ich sie im Anschluss für gut 5 Minuten ruhen ließ.
Gerade diese Ruhephase ist essentiell und sorgt für den anschließenden Hochgenuss, denn nur so erreicht man, dass die leckeren Fleischsäfte beim Anschnitt auch im Fleisch verbleiben und nicht als „Pfützen“ auf dem Teller landen! Vergleicht bei Eurer nächsten Grill-Session ruhig selber mal eine Scheibe die 5 Minuten geruht hat, mit einer die Ihr direkt nach dem Grillen anschneidet.
Beim Tomahawk muss man beachten, dass sich die Scheibe aus mehreren ganz unterschiedlichen Bereichen zusammensetzt – soll heißen, dass sich diese Bereiche auch beim Garen nicht ganz gleich verhalten werden.
Ihr werdet beim Tomahawk durch bloßes Grillen kaum ein Ergebnis erzielen können, bei dem der Gargrad einer solch mächtigen Scheibe durchgängig gleich ist – gerade nahe am Knochen wird es tricky. Legt Ihr hierauf jedoch besonderen Wert, empfehle ich Euch das Tomahawk entweder vorab Sous Vide für mindestens 1 Stunde (englisch 53°C, medium 56°C) zu garen, bevor Ihr es auf dem Grill mit den für den Geschmack nötigen Röstaromen verseht.
Oder Ihr grillt es direkt scharf an, um es danach – also Sous Vide „rückwärts“ – im Ofen (englisch 53°C, medium 56°C) garen zu lassen. Vorteil, es braucht keine Plastikbeutel (auch wenn es diese heutzutage schon nachhaltig und ohne Weichmacher gibt), aber Ihr braucht einen Ofen der sich exakt temperieren lassen lässt.
Persönlich finde ich, dass es bei einem Tomahawk auch ohne Sous Vide möglich ist ein gutes Ergebnis zu erzielen. Erst wenn das Stück jenseits der 2-3 kg Grenze ist, verwende ich ab und an Sous Vide – dann aber meist „vorwärts“.
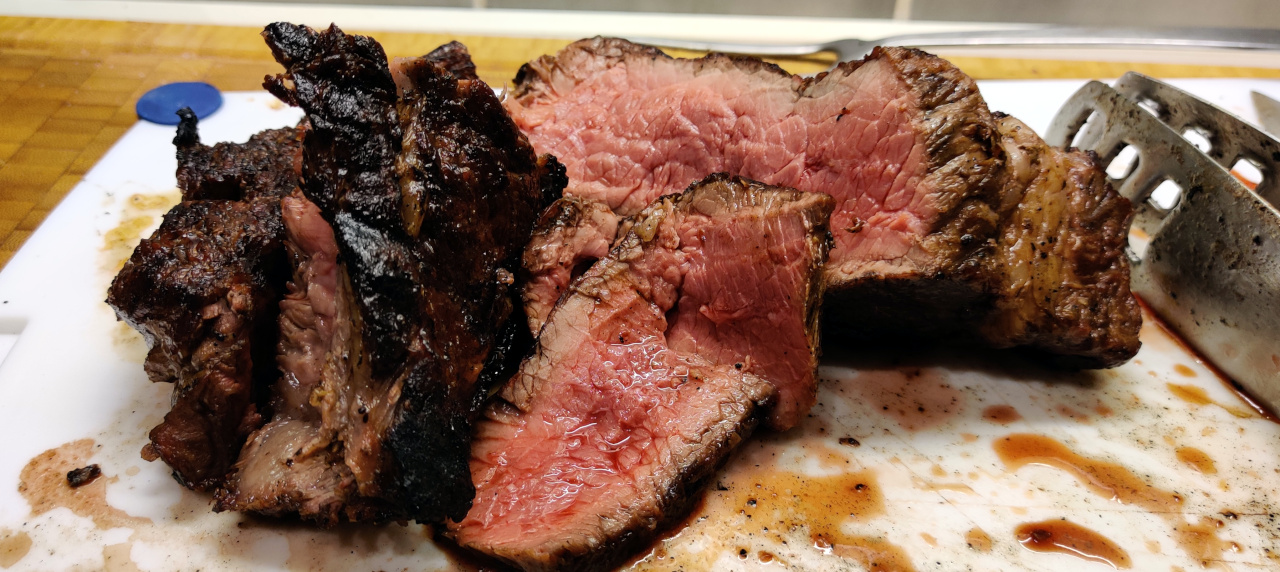
Nun aber zurück zu unserem „Scheibchen“, was mittlerweile genug geruht hat. Auf Grund der hohen Temperaturen ist zwar nicht mehr viel vom Grillmuster übriggeblieben, aber im Anschnitt zeigt sich das Steak von seiner besten Seite.
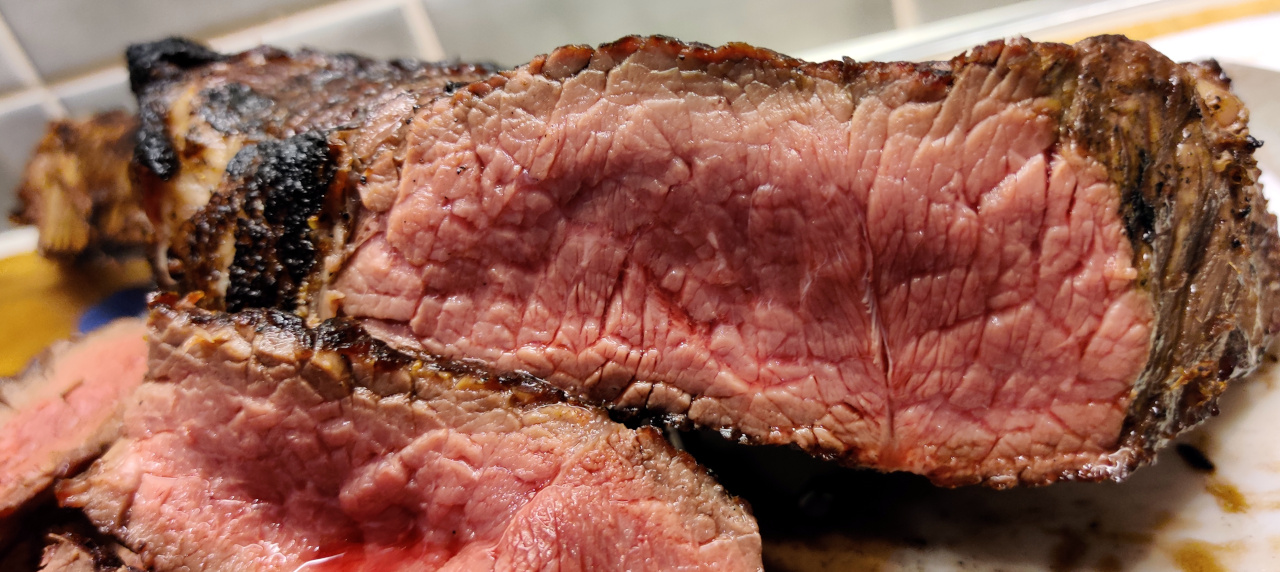
Der Gargrad liegt im Durchschnitt etwa bei „medium“, wobei einige Stellen variieren, was dem Genuss aber keinen Abbruch tut. Röstaromen waren reichlich vorhanden, das Fleisch war zart und saftig und wir brauchten auf Grund des tollen Eigengeschmacks keinen Pfeffer mehr.
Das Tomahawk haben wir „pur“ genossen und es war sicher nicht das letzte. Wir haben es diesmal sogar noch geschafft einen kleinen Teil zur Seite zu legen. Diesen haben wir später in feine Scheiben tranchiert und davon einen Thailändischen Rindfleisch-Salat gezaubert. Das Rezept hierzu findet Ihr in der Grillecke – nehmt einfach an Stelle des Duroc dann Euer Rindfleisch – fertig.
Euch Viel Spaß beim Grillen und guten Appetit!The weekend was mighty sunny – reason enough to put up the grill again and „roast“ a good piece of meat. Today it was time for the „Family Tomahawk“ – here I got myself a great piece of meat from CHÂTEAU BOEUF. The meat of this brand is exclusively available at REWE and it is French premium quality from young bulls.
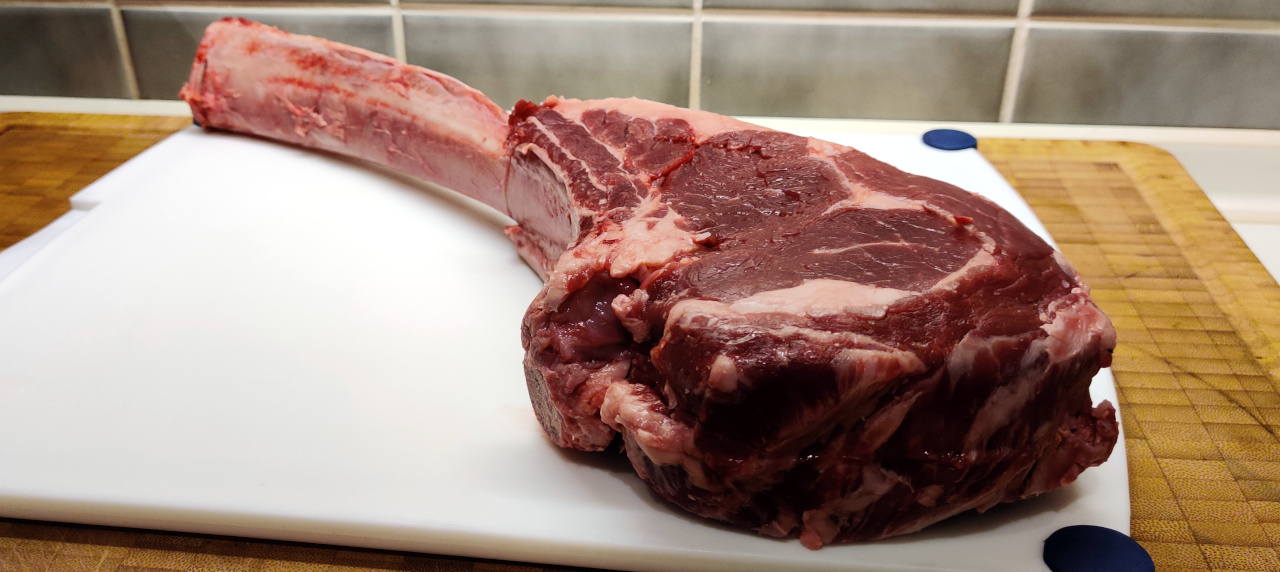
The „slice“ came with a good 1.4 kg – so despite the bones it was enough for the small family – and the price/performance ratio was also right. I had already introduced this interesting European brand to you. The fact that CHÂTEAU BOEUF focuses entirely on family-run businesses, animal welfare and sustainability are reasons enough for me to invest a few extra euros – you can taste the difference!
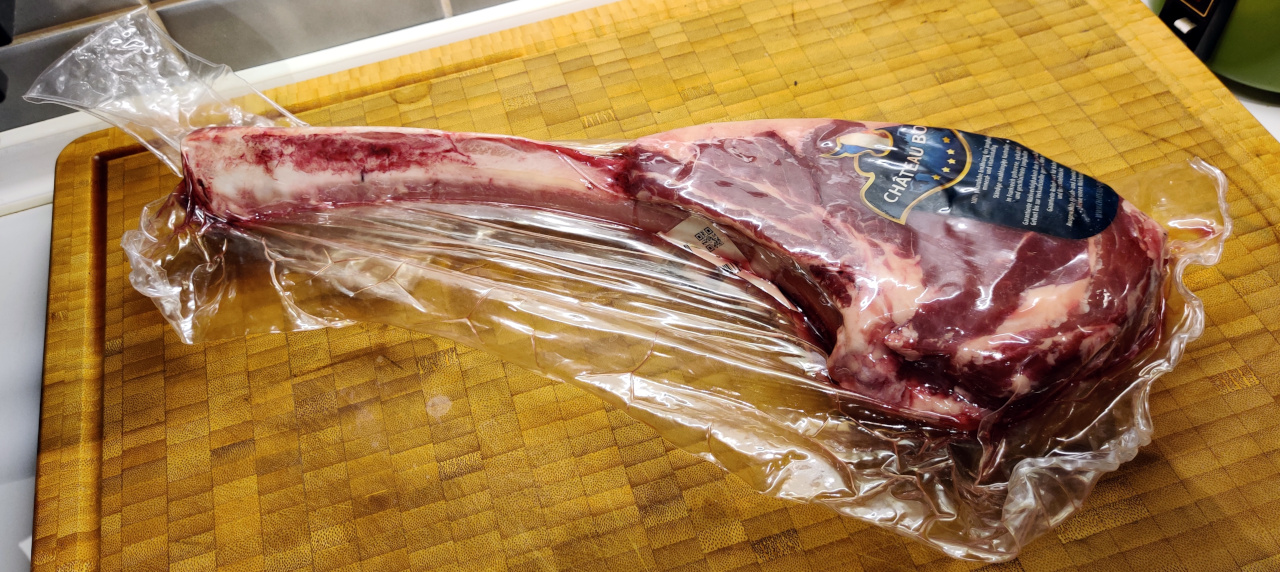
The impressive steak was vacuum-welded and, according to the labelling, optimally matured by 4 April 2020 – in other words, an exact spot landing. The marbling was already promising and the bright red slice was a good five centimetres thick. As always, I took the meat out of the fridge one hour before use. As soon as it reached room temperature, I made sure that in the end, the whole range of flavours would end up on the plate.
Especially with vacuum-sealed meat, it can be recommended to „free“ it from the foil 1-2 days before and then „dry“ it open in the fridge (don’t forget to turn it!). Some professional chefs assume that the meat would then taste even more intense and would also be more tender. This is true – but you should also keep in mind that you will need a refrigerator where the meat cannot take on any other aromas. Unfortunately, our domestic refrigerators are always full of other flavours – which can be avoided in the professional kitchen, but then becomes rather difficult at home.
After I removed the foil, I dabbed the tomahawk with some kitchen roll and salted it with fine Himalayan salt a little bit from all sides (including bone). Then I put a few drops of virgin olive oil on the hand and spread this over the whole slice.
As mentioned elsewhere, I almost always abstain from peppering before grilling. The reason for this is that the pepper would burn on the grill and in the worst case the steak would taste slightly bitter – therefore, if necessary, always use the pepper mill at the table.
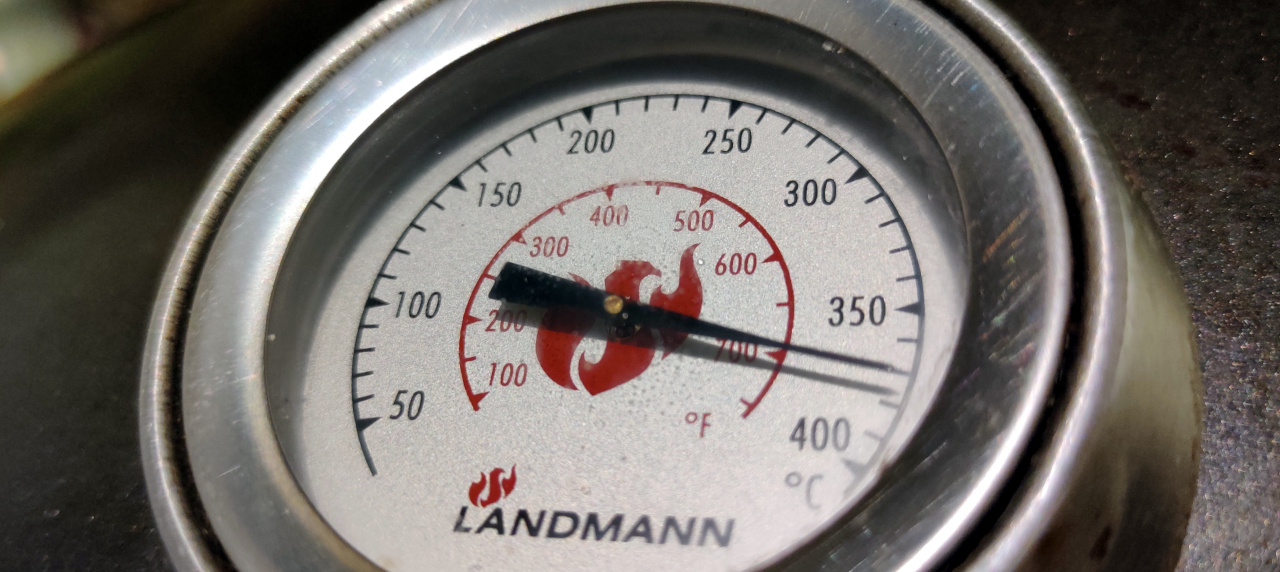
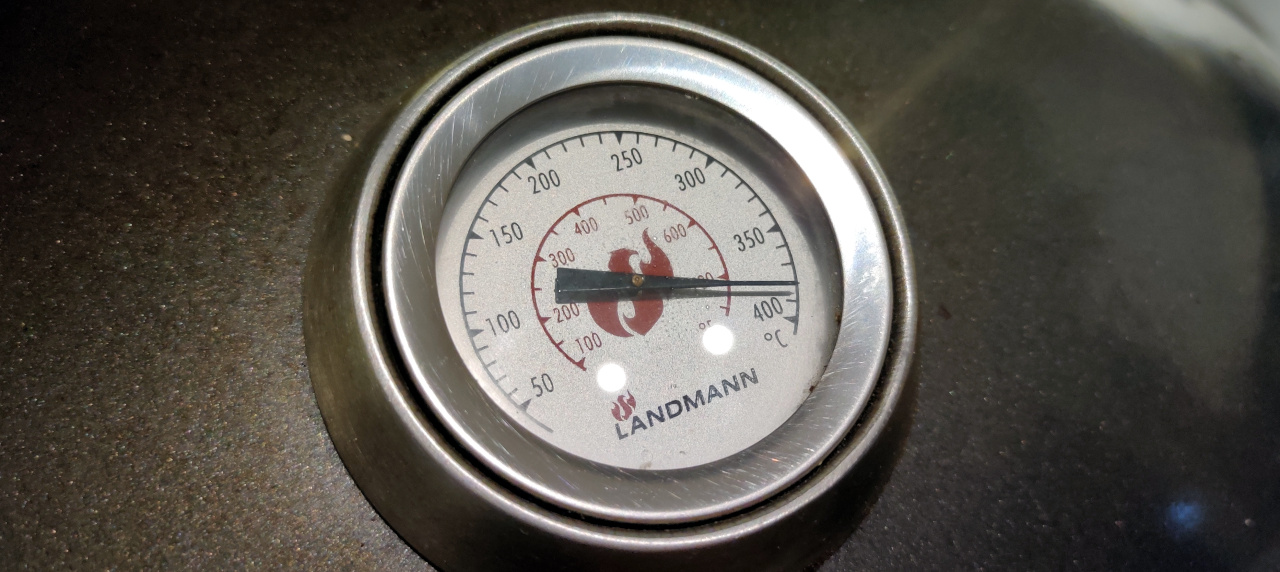
I had preheated the grill to 400°C and the time had come – I put the slice on the grill.
Close the lid and wait until the temperature had reached 400°C again – which took about 3-4 minutes. Then I opened the grill briefly to rotate the slice a little bit (don’t turn it!) – so I got a nice grill pattern.
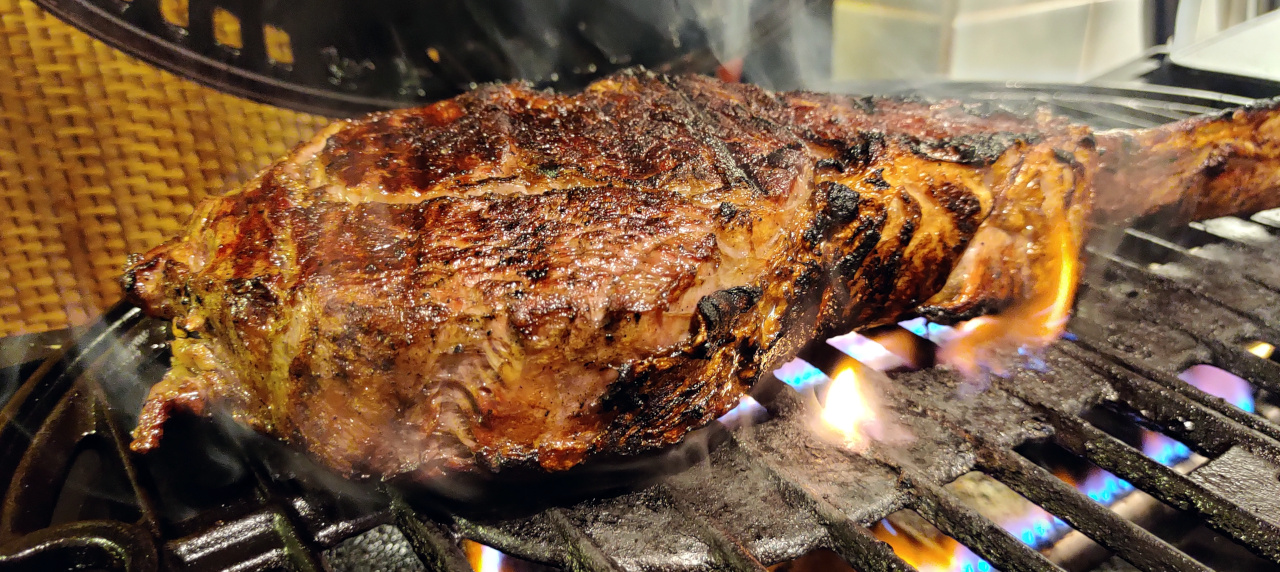
It is important that the meat should come off the grill very easily – if it doesn’t, it is still too early. After another 3-4 minutes I turned the steak and after a few minutes I also rotated it a little bit.
After that it was time to turn to the narrow side – the edge of the slice. Of course, this is only possible with the grill lid open. I used grill tongs and a turner and while rotating the Tomahawk step by step I made sure that the typical grill pattern was kept.
According to this, the steak – at least as far as the pressure test (Australian style) was concerned – had reached about the cooking degree „rare“. Since I wanted to have it „medium“, some more cooking time was necessary. So, I grilled it for about 4 minutes at 400°C on each side before I let it rest for about 5 minutes.
Especially this resting phase is essential and provides for the following high pleasure, because only in this way you can make sure that the tasty meat juices remain in the meat when you cut it and don’t end up as „puddles“ on the plate! At your next barbecue session, compare it yourself – take a slice that has been resting for 5 minutes and compare it with one that you cut directly from the grill.
With the Tomahawk you have to consider that the slice is composed of several very different areas – that means that these areas will not behave the same during grilling.
You will hardly be able to achieve a result with the tomahawk by just grilling, where the cooking degree of such a mighty slice is the same throughout – just close to the bone it gets tricky. However, if this is important to you, I recommend that you either cook the Tomahawk for at least 1 hour (53°C, medium 56°C) sous vide before you put it on the grill to get the necessary roasting aromas.
Or you can grill it super-hot and then let it cook in the oven (53°C, medium 56°C) – sous vide „backwards“. Advantage, you don’t need plastic bags (even though these are already available today, sustainably and without softeners), but you need an oven that can be tempered exactly.
Personally, I think that it is possible to achieve a good result with a tomahawk even without sous vide. Only when the piece is beyond the 2-3 kg limit, I use Sous Vide from time to time – but then mostly „forward“.
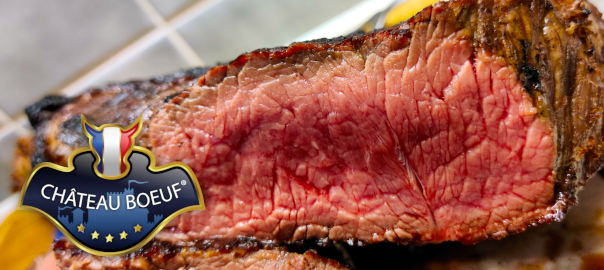
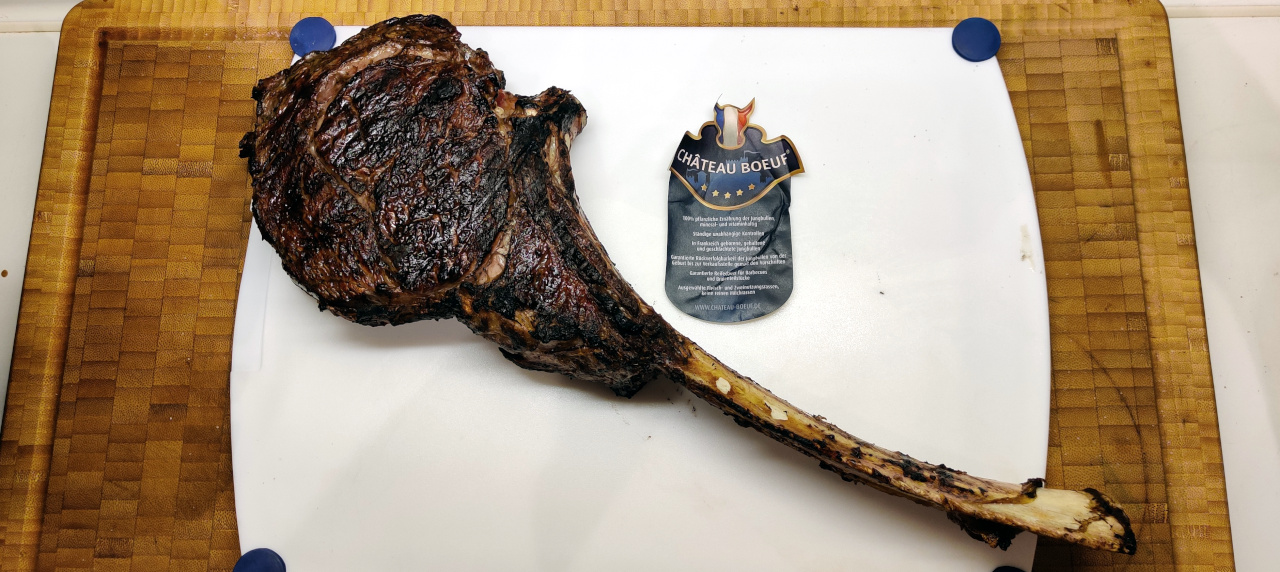
But now back to our „slice“, which has rested enough in the meantime. Because of the high temperatures there is not much left of the grill pattern, but in the cut the steak shows its best side.
The cooking degree is on average about „medium“, whereby some parts vary, which does not detract from the pleasure. There were plenty of roasting aromas, the meat was tender and juicy and we didn’t need any pepper anymore due to the great taste.
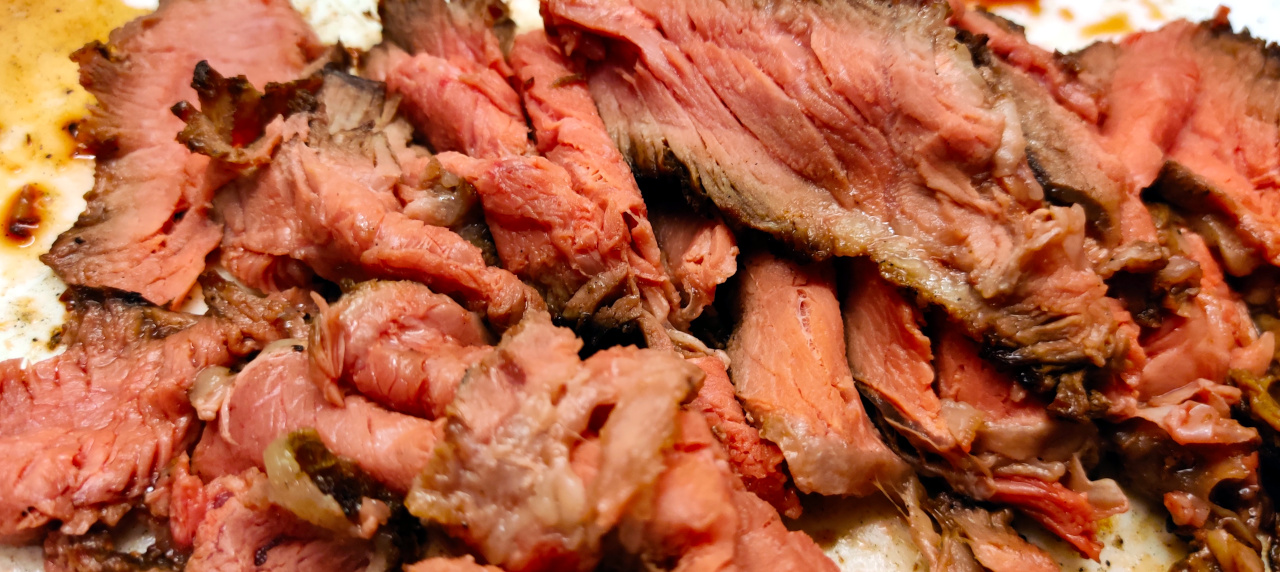
We enjoyed the Tomahawk „pure“ and it was certainly not the last. This time we even managed to put a small part aside. Later we carved it into fine slices and made a Thai beef salad from it. You can find the recipe in the BBQ corner – just take your beef instead of the Duroc – done.
Enjoy the barbecue and bon appétit!